GitLab CI/CD
GitLab CI/CD can automatically build, test, deploy and monitor your applications during iterative code changes. This reduces the risk that you will develop new code based on buggy previous versions. In the process, little or no human intervention should be required from the development to its deployment of code changes.
The three main approaches to this continuous development are:
- Continuous Integration
runs a series of scripts sequentially or in parallel that your application automatically builds and tests, for example after each
git pullin a feature branch. This is to make it less likely that you will introduce bugs into your application.If the checks work as expected, you can make a merge request; if the checks fail, you can revert the changes if necessary.
See also
- Continuous Delivery
goes one step further than Continuous Integration and also continuously deploys the application. However, this still requires manual intervention to manually deploy the changes to a deployment branch.
See also
- Continuous Deployment
also performs the deployment of the software to the productive infrastructure automatically.
Activating CI/CD in a project
Select in the top bar and find your project.
In the left sidebar, select .
Expand Visibility, project features, permissions.
In the section, activate the CI/CD option.
Select Save changes.
CI/CD pipelines
Pipelines are the most important component of Continuous Integration, Delivery and Deployment.
Pipelines consist of:
- Jobs
define what needs to be done, for example compiling code or testing.
See also
- Stages
define when the jobs are to be executed, for example the phase
testto be executed after the phasebuild.See also
Jobs are executed by so-called runners. Several jobs in a stage are executed in parallel, provided there are enough simultaneous runners available.
If all jobs in a stage are successful, the pipeline continues with the next stage.
If a job in a stage fails, the next stage is normally not executed and the pipeline is terminated prematurely.
In general, pipelines are executed automatically and do not require any intervention once they have been created. However, there are cases where you can manually intervene in a pipeline.
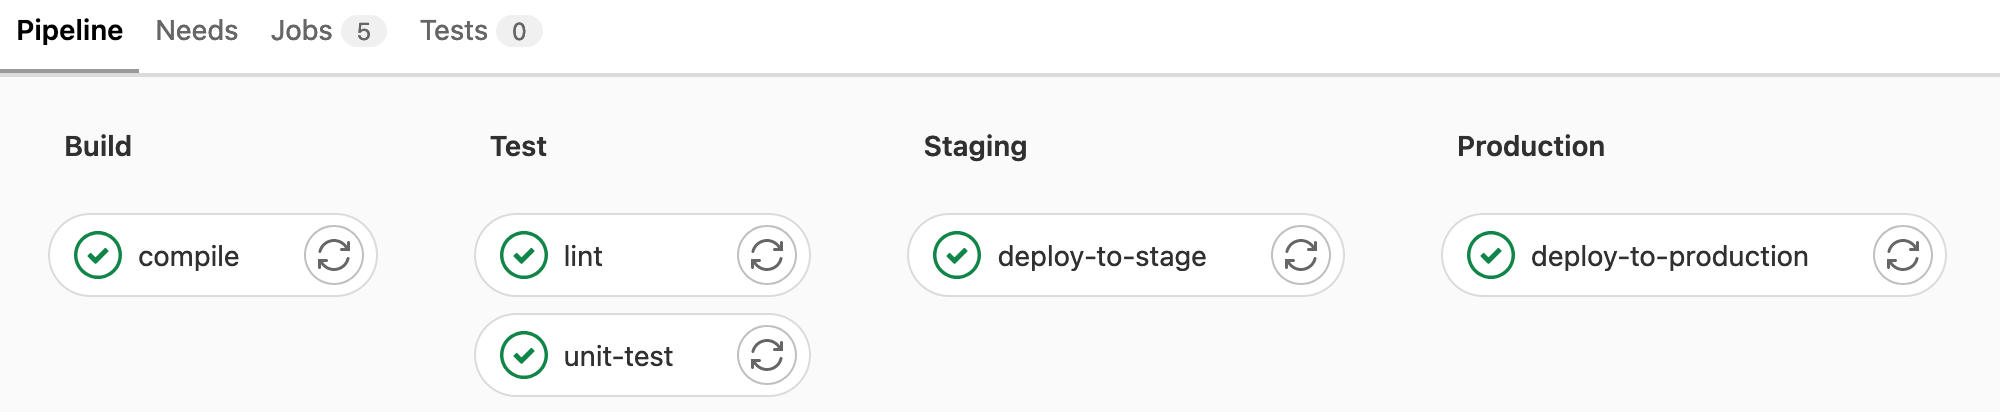
A typical pipeline may consist of four stages that are executed in the following order:
A
buildstage with a job calledcompile.A
teststage with two parallel jobs calledunit-testandlint.A
stagingstage with a job calleddeploy-to-stage.A
productionstage with a job calleddeploy-to-prod.
The corresponding .gitlab-ci.yml file could then look like this:
image: "docker.io/ubuntu"

stages:
  - build
  - test
  - staging
  - production

compile:
  stage: build
  script:
    - echo "Compiling the code..."
    - echo "Compile complete."

unit-test:
  stage: test
  script:
    - echo "Running unit tests... This will take about 60 seconds."
    - sleep 60
    - echo "Code coverage is 0%"

lint:
  stage: test
  script:
    - echo "Linting code... This will take about 10 seconds."
    - sleep 10
    - echo "No lint issues found."

deploy-to-stage:
  stage: stage
  script:
    - echo "Deploying application in staging environment..."
    - echo "Application successfully deployed to staging."

deploy-to-production:
  stage: production
  script:
    - echo "Deploying application in production environment..."
    - echo "Application successfully deployed to production."
Show pipelines
You can find the current and historical pipeline runs on the page of your project. You can also access pipelines for a merge request by navigating to their Pipelines tab. Select a pipeline to open the Pipeline Details page and view the jobs that have been run for that pipeline. From here you can cancel a running pipeline, retry jobs in a failed pipeline or delete a pipeline.
GitLab CI/CD pipeline